If you’ve ever wondered “What happens behind the scenes when I run a Spring Boot application?”, you’re not alone.
Spring Boot may look simple — just add @SpringBootApplication and hit Run — but under the hood, it performs a series of powerful operations that make it fast, flexible, and production-ready.
In this post, we’ll break down the internal working of Spring Boot in an easy-to-understand way, step by step, with a clear workflow diagram to help you visualize the process.
⚙️ What Is Spring Boot?
Spring Boot is a framework built on top of the Spring Framework that simplifies Java application development.
It removes the need for complex XML configurations and provides an embedded server (like Tomcat or Jetty), which means you can run your app directly as a standalone Java process.
🔄 How Spring Boot Works Internally – Step-by-Step Workflow
Let’s explore the internal flow that happens when you run a Spring Boot application.
🧩 Step 1: Application Entry Point (main() Method)
Every Spring Boot app starts from a class annotated with @SpringBootApplication.
@SpringBootApplication
public class JavaInfotechApplication {
    public static void main(String[] args) {
        SpringApplication.run(JavaInfotechApplication.class, args);
    }
}
✅ When you run this class, the SpringApplication.run() method is the main trigger that:
- Creates the Spring ApplicationContext
- Starts the embedded web server
- Performs classpath scanning and bean registration
- Initializes auto-configuration
⚡ Step 2: SpringApplication Initialization
The SpringApplication class is the brain behind everything. It:
- Reads configuration from
application.propertiesorapplication.yml - Determines whether it’s a web, reactive, or non-web application
- Loads auto-configuration classes using SpringFactoriesLoader
- Prepares the environment and context
This makes your app ready-to-run with almost no configuration needed.
🔍 Step 3: ApplicationContext Creation
Spring creates an instance of ApplicationContext — the central container that holds all your beans.
Depending on your application type, it uses:
AnnotationConfigServletWebServerApplicationContextfor web appsAnnotationConfigReactiveWebServerApplicationContextfor reactive apps
This container manages the lifecycle of all beans and injects dependencies automatically.
🌱 Step 4: Auto Configuration (The Magic Behind @EnableAutoConfiguration)
This is where the Spring Boot magic happens.
Spring Boot scans the META-INF/spring.factories file and automatically loads classes annotated with @Configuration.
For example:
- If it detects Spring MVC, it configures
DispatcherServletautomatically. - If it detects a DataSource, it auto-configures JPA and Hibernate.
- If it finds Thymeleaf or FreeMarker, it sets up the template engine automatically.
This eliminates the need for manual XML or Java-based configuration.
🔁 Step 5: Embedded Servlet Container Startup
Once configurations are ready, Spring Boot starts an embedded server (Tomcat, Jetty, or Undertow).
It registers:
- A
DispatcherServletfor handling incoming HTTP requests - Controllers, Services, and Repositories as defined in your code
You don’t need to deploy a WAR file — just run it like a normal Java app.
🧠 Step 6: Request Handling Flow
When a user sends an HTTP request:
- The embedded server receives it
- Passes it to the
DispatcherServlet - DispatcherServlet finds the appropriate controller (
@RestController) - The controller processes the request
- Response is returned as JSON or HTML
✅ This entire process happens within milliseconds, thanks to Spring Boot’s lightweight, dependency-injected architecture.
To learn more about Java Design Patterns, visit Java Design Patterns
🧩 Step 7: Application Ready Event
After the application starts successfully:
- Spring triggers an
ApplicationReadyEvent - Beans annotated with
@EventListenerorCommandLineRunnerexecute - Your application is fully functional and ready to serve requests
🖼️ Spring Boot Internal Workflow Diagram
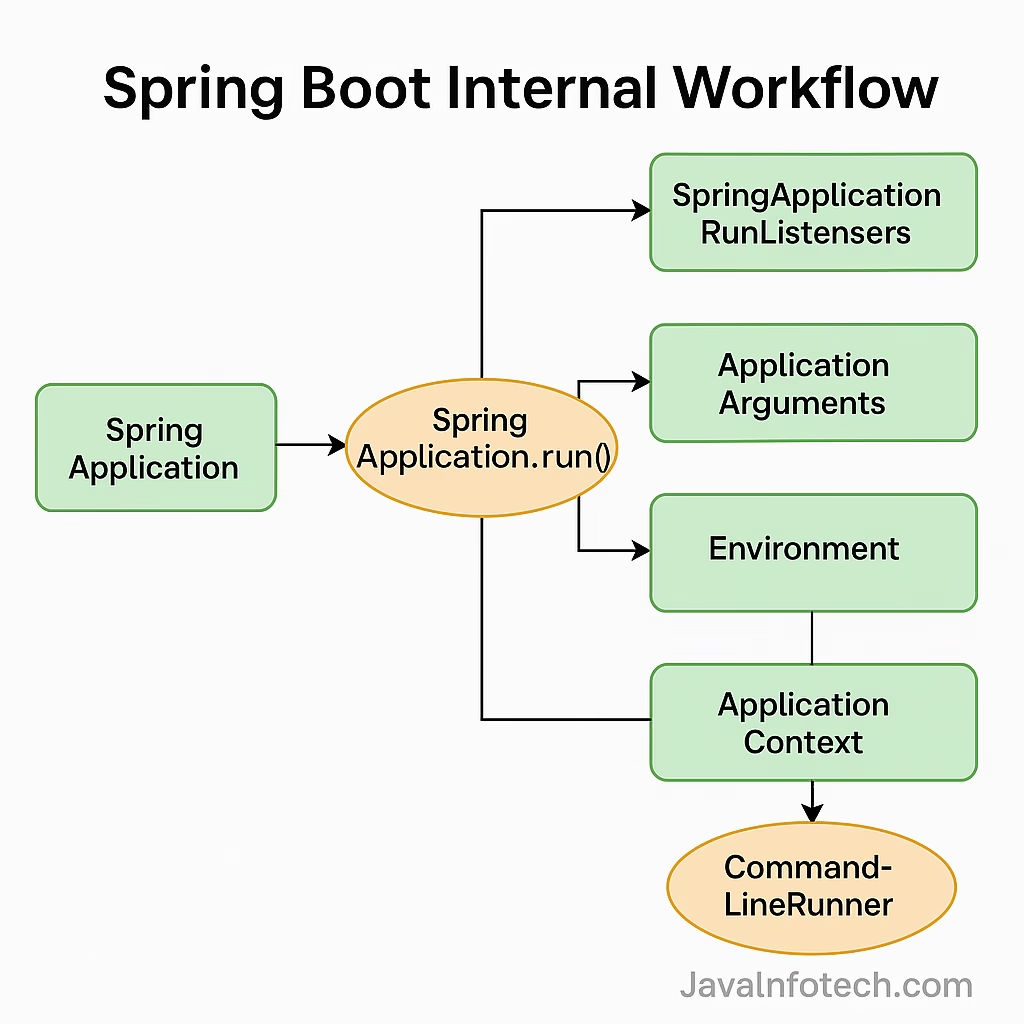
⚡ Summary of Internal Flow
| Step | Process | Description |
|---|---|---|
| 1 | main() Execution | Starts the Spring Boot app |
| 2 | SpringApplication.run() | Initializes environment & context |
| 3 | ApplicationContext | Creates and registers all beans |
| 4 | Auto Configuration | Loads configs based on dependencies |
| 5 | Embedded Server | Starts Tomcat or Jetty automatically |
| 6 | Request Flow | Handles incoming HTTP requests |
| 7 | Ready Event | Finalizes app startup |
🎯 Why Developers Love Spring Boot
- 🚀 Zero XML Configuration
- ⚙️ Auto Configuration & Dependency Injection
- 🧠 Easy REST API Development
- 🌍 Built-in Embedded Servers
- 🔒 Production-ready Metrics & Health Checks
Spring Boot helps developers focus on business logic instead of boilerplate setup.
💬 Final Thoughts
Spring Boot abstracts complex Spring configurations while keeping the power and flexibility intact.
Understanding its internal architecture helps you debug faster, customize better, and write cleaner enterprise applications.
To learn more about official configurations and new features, visit the
👉 Spring Boot Official Website.
So next time you hit “Run”, you’ll know exactly what’s happening behind the scenes! 💡
